Thursday 30 May 2013

Happy Birthday Dad

So today is my dad's birthday in Canada! I already wished him a happy birthday (in Australia time) yesterday and today I'm going to wish him another happy birthday again! Happy Birthday Dad! Two happy birthdays in one year? I'd say that gives me at least one extra brownie point.

And you know what gives me a second extra brownie point? Baking his favourite cookies and mailing them to him! I thought long and hard what to get him for his birthday this year. But seeing as I'm living kinda far away, and seeing as my dad is the HARDEST person to gift shop for (let's just say he's not the most animated gift receiver... not like my mum...) I decided to resort to the one thing that always makes him happy. Food! But not just any food. Sure he likes it when I cook him just about anything. But there's only one thing he always asks me to make every time I come home. Chocolate Chip Cookies. So I made them. And I mailed them. And he got them. And a little birdie told me he was so excited when he got his package that he called my mum downstairs to come and see too! I'm totally patting myself on the back this year because I nailed it.

This is just my normal chocolate chip cookie recipe. I've taken recipes from about 100 sources and finally think I like mine so much it doesn't need changing anymore... Well until I find something new to do to it that is.

I baked the cookies for my dad a little bit longer than I normally do however, and I added a little bit more flour than normal too. The reason for this is because I knew they'd be traveling for at least a week via airmail, and thought making them drier would help them make the journey better. So unless you're planning on sending your cookies around the world too, just follow the recipe I have posted below. Your cookies will turn out ever so slightly crispy on the edges, chewy in the middle, and sooooo goood. I promise.

Oh! And did I mention that he's 50?! Old right?! Love you dad xo

Chocolate Chip Cookies


1 cup unsalted butter, room temperature
1 cup white sugar
1 cup brown sugar
2 eggs
1 tsp vanilla extract
2 3/4 cups flour
1/2 tsp salt
1 tsp baking powder
1 tbsp cornstarch
2 1/2 cups semi-sweet chocolate chips


In a mixing bowl, cream together the butter and the sugars with a spatula until everything is smoothly blended. Add the eggs, one at a time, and then the vanilla. At this stage you can mix as much as you'd like. There's no risk of "overmixing" until you add the flour.

In a fine mesh sieve, over the butter bowl, add 2 cups of flour and all of the salt, baking powder, and cornstarch. Sift these ingredients into the butter mixture and stir until almost just combined. At this point, add the chocolate (you can use any chocolate you like. chips, chunks, sometimes I use Smarties and make them rainbow cookies) and 1/2 cup more of flour. After just barely mixing it all together it's time for you to judge whether you want to add the additional 1/4 cup of flour. The dough shouldn't be sticky, but you also don't want it too dry because then the cookies won't be melty chewy, they'll be more dense and solid. I almost always add almost all of the rest of the flour. This takes practice and lots of test batch cookies to get to know what feels right... hard work eh?

This is what you want your cookie dough to look like
Now, it's up to you what you want to do next. You have two choices. Either shape your cookies and bake them right away and enjoy, OR you can refrigerate the dough overnight (to allow the real magic to happen) and bake the next day. I think I've only accomplished the latter once. Once I get the idea of chocolate chip cookies in my head I want them immediately, not tomorrow. But if you can stand it, I'd say give the overnight rest a try. It gives the flour time to absorb more of the moisture, resulting in a chewier cookie.

To bake, divide the dough by heaping tablespoonful onto a parchment lined baking sheet. I make mine into discs, kinda like mini hockey pucks. This gives your cookies an almost perfectly round shape which I like. But if you don't want to shape your cookies, just drop them by the tablespoonful straight onto the prepared sheet. They'll be just as delicious, but they won't look as good as mine!

Bake them at 180C/350F for 8-10 minutes. You don't want any colour on the cookies EXCEPT for a teeny bit of golden brown around the edges. Take them out of the oven, cool in the pan for 5 minutes to set up a bit, then move them to a wire rack to finish cooling off. These are good hot out of the oven, a little bit warm off the rack, and even a week old by air mail.

Like my packaging? :) I should have crossed out ARNOTT'S and written CHRISTINE'S

** I'd like to note that I STARTED this post on my dad's birthday May 29th Toronto time, but by the time I posted it, it had already changed to May 30th. It's impossible to keep track of the time difference. I guess that's minus one extra brownie point for me... lol.

Monday 27 May 2013

Chimichurri Ole!

A few weeks ago I catered a party for a friend of mine and made these delicious pistachio crusted lamb chops with a chimichurri dipping sauce. Chimichurri is a South American condiment, specifically native to Argentina, I think. They use it on grilled meats as both a sauce as well a marinade. But I love it so much I put it on just about everything! I like it better as a sauce, uncooked, than as a marinade because I think the fresh herby flavour gets lost once cooked.

Put it on any roasted (or grilled!) vegetables, fish, poultry, meat... you catch my drift. This sauce is amazing, healthy, and so easy!

The house I was catering for had a beautiful industrial strength blender so I made a really nice smooth chimichurri that coated the lamb chops really nicely as we dipped and nibbled. But I don't have a blender at home (well I DO have a brand new food processor sitting in my parents' basement that I dream about every night, but that's another story) so instead I just really finely chopped everything. It still resulted in a delicious sauce, it was just a little more chunky than smooth.

This sauce makes any dinner more exciting. I just served it on some lamb loin chops with roasted butternut squash and broccoli. A pretty standard dinner, but the addition of the chimichurri was a nice new flavour. I topped my roasted vegetables with feta because I love feta, but if you wanted to use goat's cheese or some queso fresco go right ahead! Any salty cheese will pair nicely with the sweet pumpkin and the herby/sour chimichurri.

Chimichurri

1/2 cup             olive oil
1/4 cup             lemon juice
1/4 cup             red wine vinegar
1 tbsp               minced garlic
1 cup                parsley
1/3 cup             cilantro
1 tbsp               dried oregano
1/2 tsp              chili flakes
salt and pepper to taste


BLENDER METHOD: Put all the ingredients into a blender (or food processor will work as well) and blend until you get a smooth sauce. This method may yield a slightly thicker sauce (because you are emulsifying the oil) so thin out with water as needed. But make sure you check the seasoning at the end!

LOW-INCOME HOUSEHOLD METHOD: Chop the parsley and cilantro as small as you have patience for. Mash the garlic using the side of your knife to get a paste. Mix all of your ingredients together in a bowl with a whisk (or fork, or spoon, or your clean fingers...). Season to taste and use!


I know this is a really easy recipe, but I thought I'd share it anyways because I think it's a super easy and delicious way to change up the flavours in your everyday dinner recipes. No sugar-filled ketchup (tomato sauce) needed! No rich buttery fattening cheesy sauce needed! Say hello to heart healthy extra virgin olive oil and parsley :)


Sunday 19 May 2013

Saturday Jam Session

Saturday morning. Woke up with a slight hangover from a few too many drinks in the warm Manly pubs last night, but I won't let that hold me down! It's a beautiful day outside and I want to take advantage of the great natural light to take some pictures!

I've had 6 quince sitting on my counter top gently ripening for almost 2 weeks now. They've perfumed my house with rosy floral smells long enough and I decided that today was going to be the day to put them to good use. I was thinking of making a Turkish poached quince recipe my friend Alex put me on to, but then thought better of it because I was afraid that I would be the only person eating those delicious jewels... something my figure really can't afford. So, next best thing to poached quince? Quince jam! It's something I can share, eat in small quantities, and make into hundreds of other recipes! Well quince marmalade to be correct. Quick fact, did you know that marmalade was in fact originally made of quince, and not oranges? Well now you do!
 So I put on some jeans and went for a quick morning walk to the grocery store to pick up some pectin. But the little chinese grocer on my way there had a surprise waiting. A tower taller than me of beautiful ruby pomegranates practically calling my name! I couldn't resist. I bought one and quickly resumed my walk to IGA. But as I was looking for pectin, another splurge was there waiting for me. I picked up my pectin, and on the shelf next to it, two vanilla beans were eying me up. They looked at me, I looked back at them. $9 and two vanilla beans later, they were mine! I still haven't been able to decide what to do with the second bean! Vanilla sugar? Panna cotta? Ice cream? The choices are overwhelming! But don't worry, you'll be the first to know once I've decided.
This marmalade is a celebration of my two favourite fruits in season right now. Quince and pomegranate. Both are tart, and the quince develops a beautiful rosy hue once cooked that is complemented perfectly by ruby pomegranate. Add some sugar and a few extra ingredients, and you get a unique and delicious marmalade. It's a nice change from your standard berry jam, and great as a gift in this "cold" Australian "winter"  :)

I kind of created this recipe as I went and found that I added a little too much sugar, so in the recipe you'll see I've decreased the sugar by a half cup. But if you taste it and find you'd like it sweeter, by all means add that sugar back in! I love sweet jams anyway.

Quince Marmalade


6                quince
5 cups        water
1 small       lemon, juiced
2                 oranges
4 1/2 cups  white sugar
1                 vanilla bean
1                 pomegranate, juiced
50 g            pectin


The easiest way to deal with a quince is to avoid the core at all cost. It is very tough to cut through and will not soften, no matter how long you cook it. So for this recipe I scrubbed the fuzz off the outside of all the quince under running water and grated them whole directly on my hand (box) grater, four sides around the core. Leave the skin on the quince, because it helps to brighten the pink colour of the finished product.

 Put your shredded quince in a big, heavy bottomed pot, with the water and lemon juice. Bring to a boil and then reduce to a simmer. Now take your two oranges. Quarter them, remove any inner pithy core they might have, and slice paper thin so you have lots of little triangle pieces. Put them in the pot as well. Simmer for 20 minutes.

Now is time to add the sugar and vanilla bean. Dump all the sugar in at once, and cut the bean in half lengthwise, scrape the seeds out with the back of your knife, and put the lot into the pot. Continue to simmer for about an hour, covered, until the orange rind has softened completely and the jam looks rosy pink.


Mix the juice of your pomegranate (just cut it in half and squeeze with your hands over a strainer) with your pectin until the pectin is dissolved. Add this mixture straight in the pot and turn your flame up all the way. You want your jam on a hard boil for 5 minutes. Stirring often to ensure the pectin is evenly dissolved and distributed.

After 5 minutes of hard boil, turn the heat off completely and let cool for 10 minutes, stirring often. Now all you have to do is put it in jars! ...don't forget to put the vanilla bean in the jars too... This recipe makes about 3 big jars worth, so I just keep one jar in the fridge, give one away, and put one container in the freezer for later. I'm not an experienced jammer (hehe) so the idea of properly sterilizing and canning jam to put on the shelf for 6 months makes me nervous. But if you are comfortable, by all means double the recipe and stock up for the summer time when quince aren't available!

I like to pair the floral quince with vanilla, because the vanilla bean actually comes from the flower of a vanilla orchid. Although I wouldn't describe vanilla as being very floral, I think it's floral roots allow it to complement nicely with other floral flavours. And I added the orange to the marmalade because I thought it would taste nice and guess what?? I love this jam!

Saturday 18 May 2013

Improv Dinner: Pumpkin Chicken Curry

Another busy day, another exhausted me, another home late Nick... the exact equation equaling one of my improvised dinners!

It's easy to come home tired from a long day at work and want to plop yourself down on the couch and eat cereal for dinner. But that's how college students get scurvy. And I can't let that happen to us. So with aching feet, and nothing planned for dinner, I opened up my pantry, fridge, and freezer all at the same time to take inventory and (hopefully) be inspired. First thing I found? A can of cream of pumpkin soup sitting right next to my tin of curry spice. Done. What goes into a curry do you ask? Everything and anything!

I think it was at this moment that I started getting really excited. As I looked a little deeper, I found some garam masala, a can of coconut milk, a bag of carrots in the bottom of my fridge, some frozen veggies (including my forever favourite chopped spinach!), and a frozen half roasted chicken I saved for just for this moment! The ingredient list may look long and daunting, but don't worry. You can easily substitute anything into this recipe, according to what you have on hand. This was a great kitchen cleanse. And then we got to eat it!


Pumpkin Chicken Curry

2 cups spring onion
2 cloves garlic
1 tbsp olive oil
salt and pepper
1 small red chile
2 bay leaves
1 tbsp curry powder
1 tsp garam masala
1 tsp tumeric
1/2 tsp cumin
2 carrots
400 ml coconut milk
420 g cream of pumpkin soup
400 g canned lentils, rinsed
1 box frozen chopped spinach, defrosted
2 cups cooked, shredded chicken
1/2 cup chicken stock


Roughly chop the spring onion and garlic. Sweat on low heat in a big pot with the oil and all the seasonings and spices for 5 minutes. This mixture should look a little like a paste by now. Chop up the carrot into bite sized pieces and throw into the pot as well.
The steam kinda steamed up my camera lens :)
 Now you can add your canned ingredients: coconut milk, pumpkin soup, and lentils. Simmer the pot for 15-20 minutes until your kitchen smells warm and spicy, stirring occasionally. Taste for seasoning at this stage. I added a pinch more salt. But if it tastes good to you, then you don't have to add any more. Throw in the defrosted spinach, shredded chicken and chicken stock to help loosen things up a bit. Simmer for an additional 5 minutes to warm the chicken through. Serve and enjoy!

You can make some steamed rice to go with this. If you have some saffron hanging around, steep it in some water before adding it to your rice cooking pot to give the rice a bright yellow color and surprising flavour. For some added nutrition, throw in some frozen peas!


I served mine with poppadums because I love dipping them in curries. All you have to do is microwave them one at a time for one minute and you get crispy crunchy poppadums without the hassle or added fat of deep frying them :)

This was a delicious and healthy dinner that I was able to put together in about 45 minutes, all while watching Friends reruns. Bliss!


Tuesday 14 May 2013

Bringing Home IKEA and Making Meatballs

Ever been to IKEA? I have. And I love it there. I love almost everything about it; except for the feeling you get once you're half way through the store, you are exhausted from sitting on couches, lying in beds, pretending you have a really stylish house, and just want to GET OUT! I'm sure you're nodding your head in agreement right now. And I'm also almost positive you're thinking about two things: the $1 hotdog with your name on it after the checkout and those delicious meatballs!

Call me crazy, but I can't go through an IKEA without grabbing a plastic tray and waiting my turn in the cafeteria line-up to get a plate of those sweet little meatballs. I probably wouldn't accept this style of food service at any other restaurant. And I admit that I sometimes catch myself looking over my shoulder making sure that no one I know is around watching me indulge in my guilty pleasure. But once my plate is licked clean and stashed in their great dirty tray conveyor belt, I can't help but feel satisfied, happy, and excited to build my new furniture!

It's thanks to these meatballs that I was able to convince Nick to just step foot into an IKEA. All of his work experience has given him quite the expensive taste in designer furniture. To him, IKEA furniture is cheap cheap cheap. But that's exactly why (at this time in our lives) I think it's so great! I don't need a beautifully hand carved and timeless oak dining room table for $1500. I need a table that cleans easily, looks nice, and stands upright.... catch my drift?

So after our first trip to IKEA where all we bought was a large plate of meatballs (and two dollar hotdogs), I was able to open Nick's eyes to a whole world of furniture in our price range! Thank you IKEA meatballs, for helping furnish my apartment. XO

Homemade IKEA Meatballs with Crispy Potato Wedges

Meatballs:         
500 g     lean beef mince
1 large    brown onion, grated
1 clove   garlic, minced
1/2 cup   quinoa flakes
1             egg
3 tbsp     milk
1/4 cup   chopped parsley
1/4 cup   chopped mint
2 tsp       salt
1 tsp       pepper

Glaze:
1/2 cup   raspberry jam
1/4 cup   thickened cream
salt and pepper to taste

Preheat your oven to max on the grill (broiler) setting. In a mixing bowl combine all the ingredients for the meatballs. Roll the mixture into ping pong sized balls and line up on a parchment lined sheet tray.

Place the tray on the top rack of your oven and grill for 5-10 minutes until the tops are golden brown and sizzling. Flip over the meatballs and grill for another 5 minutes. They should be completely cooked through at this stage.

All that's left to do is saute the meatballs in a touch of chicken stock and all of the raspberry jam. Once the sauce thickens and coats the meatballs, drizzle in the cream. Turn the heat to low and flip the meatballs in the sauce for another minute. Season with salt and pepper and make sure to taste the sauce. You want it to be sweet and creamy, but savory at the same time. This is dinner, not dessert. Time to serve up and enjoy!

Crispy Potato Wedges:

Take 8 washed baby potatoes and cut each one into 6 wedges. Put the wedges in a mixing bowl and add 2 tbsp olive oil, 2 tbsp dried bread crumbs, 2 tsp salt, 1 tsp pepper, 1 tsp paprika, and 1 tsp oregano. Mix together and spread on a parchment-lined baking sheet. Bake at 200 degrees C for 30-40 minutes, or until golden brown and soft on the inside.

You can omit the bread crumbs if you want, I just like to use them because they give the outsides of the potatoes a great crunch. It makes them taste just like the frozen wedges you know and love but these ones are homemade with love and without any weird chemicals or preservatives.


This was a great meal to have on a Monday night. I was still recovering from a busy weekend, and this dinner was simple to put together, no stress, and tasted so good! If you don't have quinoa flakes there are two options. Either throw some whole quinoa into a food processor and make your own flakes, or just use breadcrumbs. I used quinoa because I like the nutritional value it adds to food. The meat balls will be fully cooked after being under the grill, so they are a great recipe to make ahead. All you have to do is reheat them in the sauce and they're ready to go! The sauce is slightly sweet and glossy, just make sure you add a little salt to balance the sweetness.

I paired the meatballs with the wedges because that's the kind of potato we had sitting in the cupboard. But as it turned out the sauce from the meatballs was just perfect to dip the wedges into! Way better than ketchup, I swear. But these meatballs would be just as good with some creamy mashed potatoes, plain rice pilaf, or... fresh rolls?... I think I just got another idea ;)


Sunday 12 May 2013

Surprise Post: (Healthier?) Spanakopita

I wasn't planning on posting over the weekend. But I just couldn't help myself. I'm finding that every time I cook something all I want to do is arrange it nicely on a plate, take pictures of it, and write down the recipe! I don't just write this blog for other people (hi mum and happy mother's day xoxoxoxo) to read. As I accumulate more and more posts I'm starting to love looking back on all the things I've been cooking lately!

So that's how this post came about. Saturday night I had plans to visit a friend's FABULOUS new apartment in Elizabeth Bay for a few glasses of wine before going out for the night. (I always like to start my night as classy as possible because I'm sure by the end of it I will smell like a combination of a bar mat, ash tray, and strangers' B.O. after being cramped in some trendy new bar in Surry Hills... classy right?) So in keeping with my classiness I wanted to bring over some finger food to complement our $20 chard. I didn't have much time and I definitely didn't feel like walking all the way down to the grocery store so I was at the mercy of my refrigerator and pantry. Lucky for me I'm Greek and always have frozen pastry and boxes of spinach in my freezer.

**Side note: If you are on a budget, but love throwing spinach last minute into sauces, soups, etc. stock up on frozen chopped spinach! It costs literally 99 cents and amounts to about the same weight as a $10 bag in the fresh produce section! I LOVE it and just wanted to share that tid bit. Try it once, you'll be buying frozen spinach every time you go to the grocery store now.

I had everything I needed, except not really enough feta so I was forced to improvise. I love improvising! Especially when it turns out well :) I mashed some chickpeas to a pulp and mixed it in with all the other ingredients, and it turned out great! And with that added protein and lower amount of cheese, this recipe could qualify as some what healthy... right??

Spanakopita

1 tsp         olive oil
1/2 cup     spring onion
1 pkg        fresh dill, chopped
250 g        frozen chopped spinach
100 g        feta cheese
1/4 cup     grated parmesan
200 g        chick peas, mashed
1/4 cup     pine nuts
1               lemon, zested
salt and pepper to taste
1               egg, beaten
2               sheets frozen puff pastry
First you saute the spring onion and dill in the olive oil until it is soft but not browned. That's about all the cooking you'll have to do until it goes in the oven! Take the pot off heat and add the spinach (which you need to wring dry in a colander first), the mashed chick peas, and the pine nuts. Stir together and once the mixture is coolish to the touch you can add the feta, parmesan, and lemon zest.


This is the point where you can taste for seasoning. Once it tastes good, add 3/4 of the beaten egg. Now you have your filling!


All you have to do now is divide the mixture in two and scoop it into two log shapes on the bottom edges of the two sheets of puff pastry.


Roll up the pastry, don't worry about being too tight or not tight enough. As long as you can finish the roll so that it rests on the end of the roll, it will turn out great!


Transfer the rolls to a parchment lined baking sheet, brush with the rest of the beaten egg and sprinkle with some sesame seeds for decoration. Bake in a 200 degree Celsius oven for 30-45 minutes until golden brown and puffed. I rotated the pan once while baking.

Wait 10 minutes and using a really sharp bread knife, slice each roll into 8 pieces. Now they're ready to enjoy!

Look at all those layers!

 This recipe can be doubled easily. I did rolls because I only had an hour to get everything done, but if you wanted to make mini triangles or even one big pie feel free to do so! You can also use layed phyllo sheets, puff pastry is just what I had on hand at the time.

This isn't your ordinary spanakopita. The lemon zest gives it a light freshness that isn't traditionally found here. And I think the pine nuts add a tender, almost creamy, bite. Flaky pastry, creamy and light filling, with a little punch of dill. I make this at least once a week.


Saturday 11 May 2013

The last of my rhubarb

This week has flown by! I meant to get this post up on Thursday night, but I ended up having some friends over Wednesday for a scrumptious roast chicken dinner (which I will HAVE to make again so I can take pictures and blog it... think crispy skin, wild rice, roasted beetroot... my mouth is watering). Thursday I was back in the game and made this delicious rhubarb cake.

But because it's now a chilly 18 degrees Celsius autumn down here in Sydney, the sun goes down at 5:30pm meaning by the time my beautiful cake was puffed up and golden brown it was pitch black outside offering no natural sunlight to aid my handicapped Sony cyber-shot camera :)

Friday comes along, and you all know how Fridays go, so today is the day! I woke up early and got into my 8am photo shoot. Just me and my cake.

I think this was a good farewell to what was left of my rhubarb purchase. The cake isn't too too sweet (but if you like things a little sweeter just top it was a heavy light sprinkle of powdered sugar and bob's your uncle!) and the soft bits of rhubarb speckled within it offer not only a slightly tart flavour similar to a mellowed out cranberry, but some added moisture as well.

It's actually an upside down rhubarb cake, as you'll see later. And my favourite part of the cake is definitely the layer of rhubarb that is lined on the top (bottom at first) of the cake. That, paired with the crunchy/tender almonds is just heaven!

Next on my to-do list is actually an idea from my friend Alex! He just went on another one of his epic adventures, this time biking through Turkey, and who knows where else, and he sent me a picture of these ruby ooey gooey sticky poached quince in a bakery in Istanbul. After a solid hour of trying to find out what they are (and how to make them in an ENGLISH recipe) I think I've succeeded. Taste test is next.

But I'm getting a head of myself here, first let's marvel at this perfect rhubarb cake. yum.

Rhubarb Cake

1/2 cup     Cream cheese
1 1/2 cup  Brown sugar
1               Egg
1               Orange, zested
1 tsp         Vanilla extract
1/2 cup     Greek yogurt
1/2 cup      Whole milk
2 1/4 cup   Cake flour, sifted
1/4 tsp        Salt
1 tsp           Baking soda
1/2 tsp        Baking powder
1 1/2 cup    Finely diced rhubarb
2                 Rhubarb stalks for garnish


First thing you have to do is set your oven to 250 degrees C fan forced.

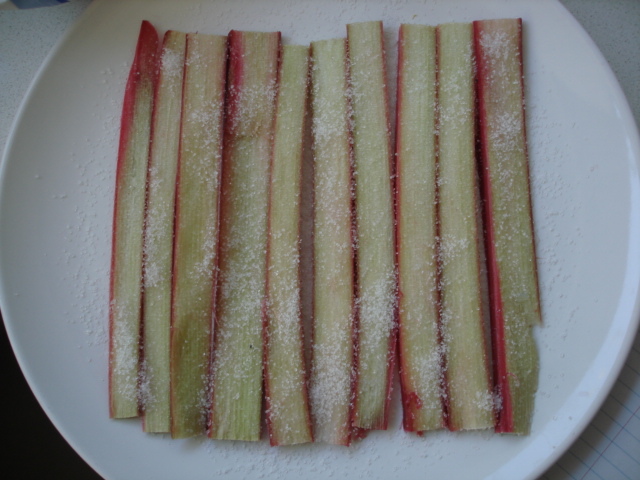
Next to prep the rhubarb that will go on the top of the cake, you take the 2 reserved stalks and thinly slice with the natural grain until you get enough strips to lay flat side by side, covering the bottom of your baking dish. Sprinkle with a heavy pinch of sugar, like this!

Now to make the batter. It is very easy, just like a banana bread. First you soften your cream cheese. I did mine in the microwave for about 30 seconds until it was super soft. It wont look melted, but give it a stir and you'll know what I mean. Next add the sugar and mix together with a spatula until smooth. Add your egg, orange zest, and vanilla extract. Next up is the yogurt and milk. Once this mixture is smooth, you can add all the dry ingredients with the rhubarb as well. You don't need to worry about coating the rhubarb in extra flour or anything, because this batter is quite thick so there's no worry about the rhubarb sinking to the bottom of the pan. It stays nicely scattered throughout the cake with no fuss.

To assemble the cake, line the bottom with a piece of parchment paper (to ensure it comes out easily once baked) and sprinkle with sliced almonds and some dessicated coconut.

I forgot to line the pan before taking this picture, but you catch my drift... 
Next, time to lay out your pieces of rhubarb on top of your almonds and coconut. Make sure they fit all lined up, side by side in the pan. It's ok if the pieces overlap a little, this cake is supposed to look and taste great but be really easy to make.

Once the "top" of your cake is set, pour in all your prepared batter at once. Carefully spread the batter with a light touch (you don't want to move the almonds and rhubarb around too much) until it is smooth on top.

Put into your preheated oven for about 30-45 minutes. The top will crack slightly and a toothpick inserted in the centre will come out clean once it's done.

Wait 5 minutes before trying to flip it over onto a serving plate and peeling back your sheet of parchment.
This is the cake after I flipped it over
Easy as can be right?! And a great cake to have this time of year when guests are over. I served mine along side breakfast this morning and 4 out of 4 people loved it! Pretty good track record if I do say so myself..


                               Goodbye delicious rhubarb!


Tuesday 7 May 2013

Exploring Rhubarb

I usually get all my grocery shopping done in one go. On Sundays, Nick and I get in the truck and head down to the grocery store to buy everything we'll need for the week. I love doing groceries. I make a weekly menu at home, write a list of everything I'll need,  and leisurely browse the shelves of the supermarket picking up anything extra that catches my eye.

But this weekend was a little bit different. Saturday I spent the day indulging in some much needed girl time shopping at the Glebe Markets, and capped off the day eating (almost) a whole rack of saucy beef ribs. Then Sunday was Easter Sunday starting with a four hour lunch with family, and ending with my first blog posting! So needless to say, groceries were neglected. Meaning that on Monday after a full day of work, Nick and I had a little Supermarket Sweep to get done.

With no weekly menu written out and definitely no time to make a list, we jumped in the truck and I decided to let the seasonal produce set my course. First thing I noticed was the deliciously floral smell of ripe quince!... but we'll get to those beauties this weekend. It wasn't until I was almost through the fresh produce section that I noticed the deep red and crispy rhubarb just calling for me to pick it up. And it was on sale! I love how you can get fruit and vegetables the cheapest when they are the most naturally ripe.

The first thing that came to my head was strawberry rhubarb pie. But with strawberry season pretty much over, I decided to take the opportunity to look at rhubarb a bit more creatively. And thanks to the fabulous weather Sydney's had lately I was really craving something fresh and punchy so... Salsa! Feel free to eat this salsa with fish, chicken, tacos, etc. I put mine on some pork schnitzel I fried up. The sour crunchiness of the rhubarb paired with the sweet crisp apple made a great topping for the pork.


But there's still plenty of rhubarb left over so get your glasses of milk ready for a sweet dessert next..

Rhubarb Salsa


1 cup  small dice rhubarb
1 cup    small dice apple
3 tbsp minced scallion
1/2       minced chile
1 small lemon, juiced
1 tsp     chopped parsley
3 tsp     honey
1 tsp     olive oil
1       orange, segmented
salt and pepper to taste
To start with cut the ends off one big stalk of rhubarb and, just like celery, peel back the tough skin to reveal the light pink insides of the rhubarb. Finely dice and put in a mixing bowl. Next finely dice the apple and add it to the rhubarb. Any sweet and crisp apple will work, and don't worry about peeling it because the skin not only adds another great colour to the salsa, but nutritional value as well. Add the minced spring onion, chile (as much as you dare!), lemon juice, honey, olive oil, and seasoning to the bowl as well.


Now time to segment the orange. You can use any citrus fruit you'd like, I just the like sweetness and bursts of fresh juice an orange gives to the salsa. To segment an orange first you cut off both ends of the orange so you have two flat surfaces. Next take your knife and run it down the sides, following the natural curve of the orange removing all of the white pith.


Once you have a perfectly cleaned orange, use you knife to cut between the segments, removing the juicy fruit. Be sure to do this over the bowl of salsa so you catch any juice that runs out of the orange.

Once you have your segments added to the salsa, the only thing to do is to wait for all the ingredients to meld together. It won't take long. I'd say give the salsa a good 20 minute rest and then have at it! 

As I said before, I served the salsa on top of some pork schnitzel. The apple and rhubarb combination made this really nice sweet and sour combo that lifted the pork schnitzel to a refreshing and slightly healthier level. Enjoy, because I can't promise you the next rhubarb recipe will be quite as good for you :)


Sunday 5 May 2013

A fresh start with a tasty classic: Koulourakia

I'm doing it! After weeks of telling myself to start taking pictures of my food, I finally dusted off the remaining Mediterranean sand between the buttons and charged up the ole' camera. This blog is going to be an ode to all my favourite foods and successful experiments, using only ingredients and recipes following what's in season. I'm getting excited already :)

So how better to restart my blogging life (embarrassing photos live on for eternity on the internet but somehow the food blog I worked on whilst in university has disappeared) than to get down to what I know best... Greek food! And with it being Greek Easter Weekend, Koulourakia are the perfect treat following the season. These cookies aren't too sweet and go perfectly with a hot cup of coffee or tea. This will be my breakfast for the rest of the week.

Koulourakia

Makes about 18 cookies

 
110 g         Butter
1/2 cup      White sugar
1 tsp          Vanilla extract
1/2             Orange, zested
1 small       Lemon, zested
2                Egg yolks
1/4 cup      Milk
2 1/2 cups  Flour
1 tsp           Baking powder
1/4 tsp        Baking soda
1/8 tsp        Salt

1 tsp water + 1 egg yolk = egg wash
sesame seeds (optional)

The key to baking these cookies (and pretty much any other cookie) is that all the ingredients are at room temperature. This way everything blends easily together without having to overwork the dough.

Preheat your oven to 180 degrees C

In a bowl cream the butter and sugar with a rubber spatula until the sugar looks dissolved into the butter. Add the vanilla, citrus zests, and egg yolks and mix until everything is incorporated.

Next pour in the milk and gently stir until you have a sort of well in which to add the final ingredients.

Add the flour, leaveners, and salt all at once. Gently combine everything until a soft dough comes together. If it is still sticky to the touch add a little more flour 1 tbsp at a time until you get a soft dough.

Take the dough one heaping tablespoon at a time and roll into a 4-inch rope. Fold in half, pinch the ends together, and twist the cookie twice to make the signature shape. If you are having trouble with this shape, you can also make snail shell spirals :)


Place your cookies on two cookie sheets prepared with parchment paper. Brush with some egg wash (just use your fingers if you don't have a pastry brush) and sprinkle with sesame seeds before placing into the oven.

Bake for 15 minutes, rotating the trays after 10 minutes to ensure the cookies are all evenly browned. You want a lightly golden cookie, just slightly browned on the bottoms.


After cooling down a bit, these cookies have a thin crispy outside while remaining soft and tender on the inside. Try one with some coffee, you won't be disappointed!